Best Web Hosting (2020)

Disclosure: When you purchase a service or a product through our links, we sometimes

Best web hosting
Data doesn’t lie – all of our reviews are based on each web host speed and uptime.

Finding a good web hosting can take a lot of time and money.

To date, we’ve signed up, tested and reviewed over 30 different web hosting companies.

This also means that we have their performance data.

Uptime and load time are two of the most important factors when choosing a web host (next to their cost).

Here is our review process in detail:

  • We sign up with the web hosting plan offered by the hosting service
  • We set up a blank WordPress website
  • We monitor their performance, such as uptime and speed
  • We check their features, limitations, pricing and customer support
  • We publish the review (updating once a year)

The current ranking formula is based on average uptime, average speed and cost. If you want more detailed data, see this Pingdom data page.

10 Best Website Hosting Providers

Here is a list of 10 best website hosting providers that have performed well in 2017-2020:

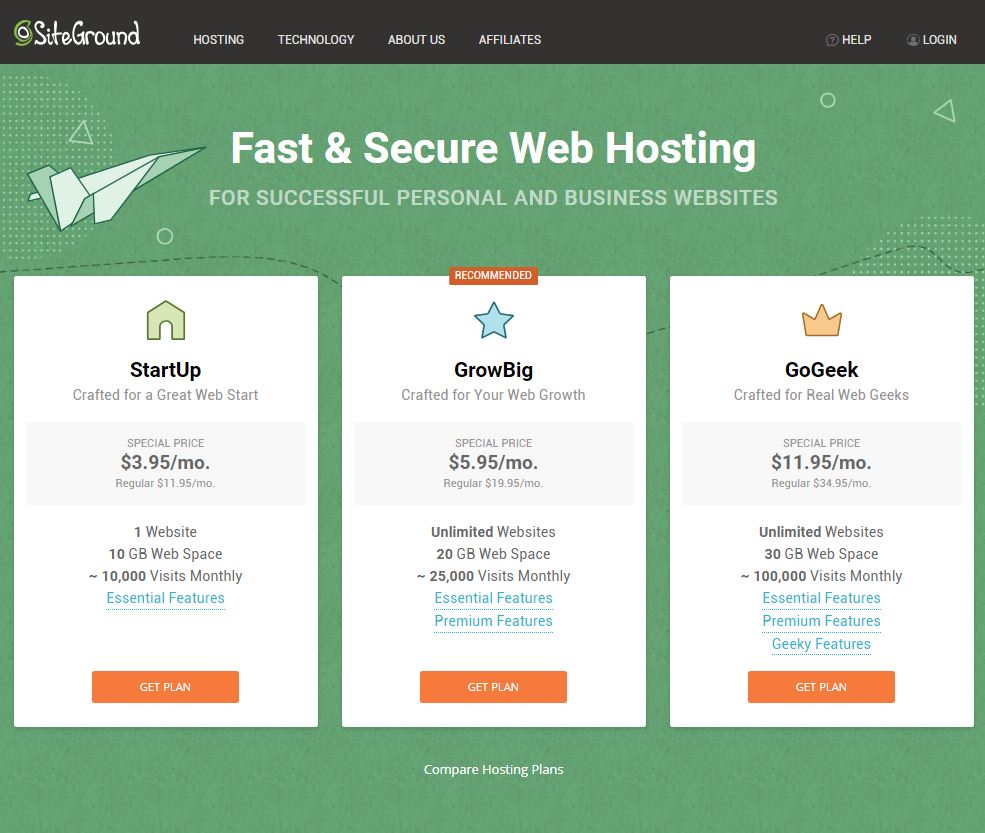
1. SiteGround – Best WordPress Support ($3.95/mo)

SiteGround review
Visit SiteGround.com

SiteGround Pros:
+ Very Good Uptime (99.99%)
Fast and Knowledgeable Support
+ High-Performance WordPress Hosting
+ Free Site Migration
+ Easy to Use, includes cPanel

SiteGround Cons:
– ‘Setup Fee’ for Monthly Billing
– Limited Storage Space


With an introductory rate of $3.95/month (for a minimum of 12-months) and a renewal rate of $11.95/month, SiteGround is not the cheapest web host on our list.

And sure, you can probably justify this hefty price tag by pointing to their free SSL certificates, site migration, CDN, email accounts, and daily backups.

Or the impressive WordPress features, intuitive cPanel and highly knowledgeable support team…

… But when you consider that your site will be limited to only 10GB of storage space, 10,000 monthly visits, and a ‘fast-but-not-fast-enough’ speed of 713ms, it starts to become a harder sell.

However, on the good side, they have data centers across US, Europe and Asia, a strong reputation in the marketplace, and plenty to offer new customers. But you can get more bang for your buck by using one of our top three hosts like Bluehost or HostGator.

SiteGround last 16-month statistics
SiteGround test site speed from December 2017 to March 2019

Visit SiteGround.com

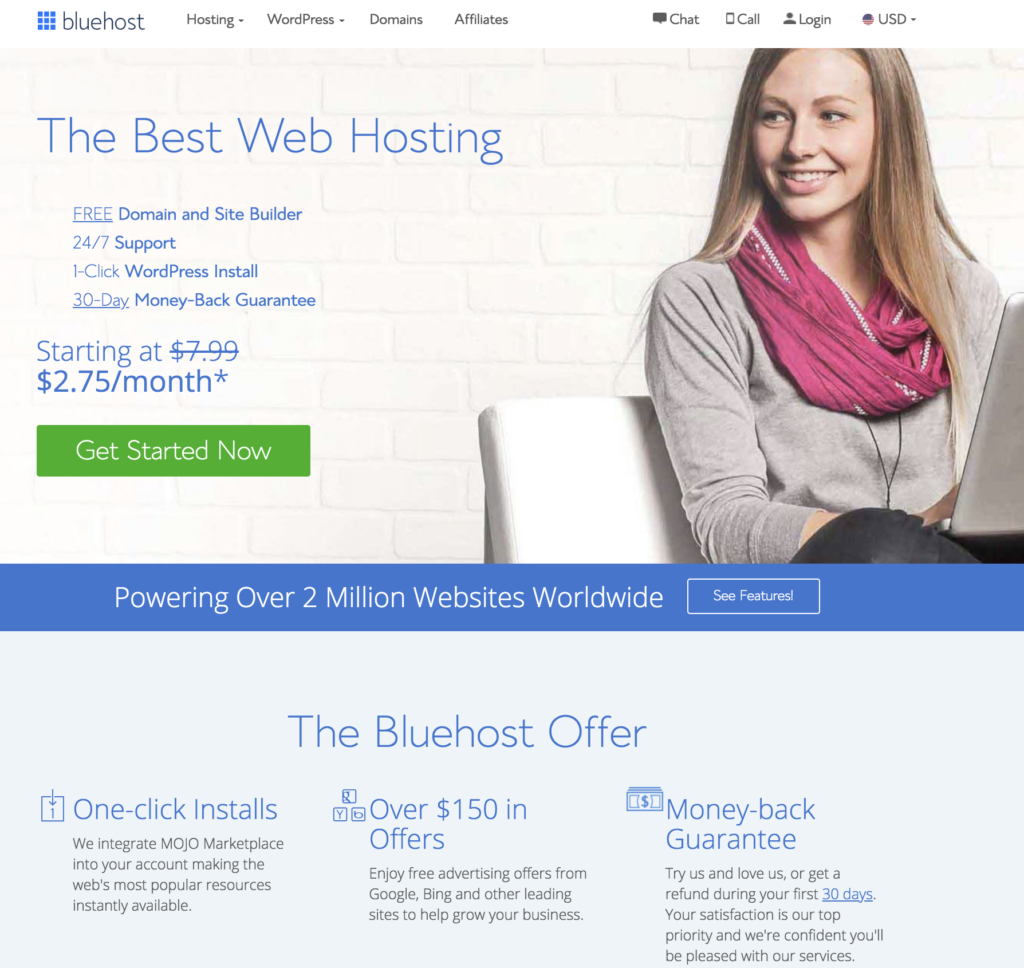
2. Bluehost – Best Uptime Hosting ($2.75/mo)

Bluehost's homepage
Visit Bluehost.com

Bluehost Pros:
+ Best Uptime (99.99%)
+ Fast Load Time (0.41ms)
+ Cheap “Intro” Cost ($2.75/mo)
+ Easy to Use and Signup
+ Fast Support (Live Chat and Phone)
+ 30-Day Money-Back Guarantee

Bluehost Cons:
– No Free Site Migrations


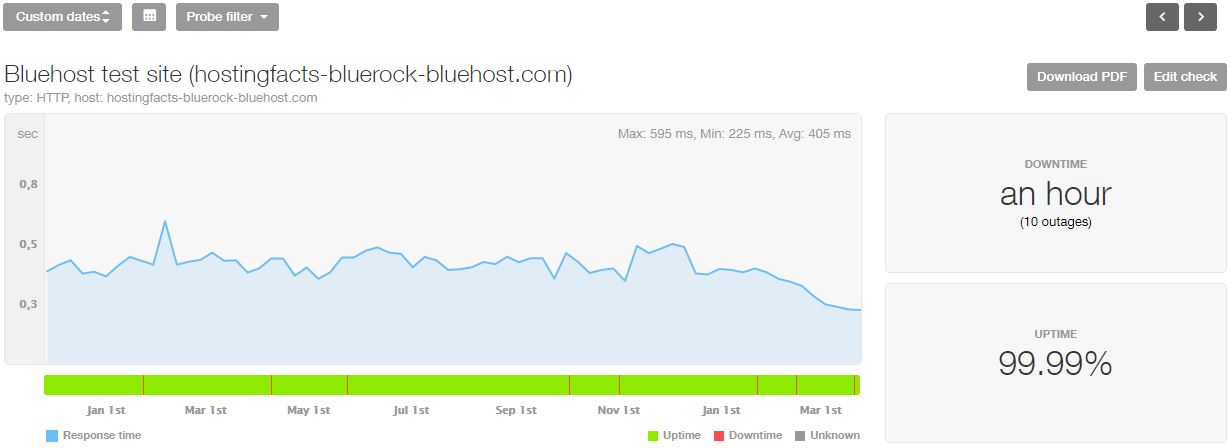
Bluehost is our top-rated web hosting company because their last 16-month uptime and speed is very strong – 99.99% and 0.41ms respectively.

Their 3-year introductory price is $2.75/mo and that comes with features like free domain name, website builder and one-click install for WordPress, Joomla, and Drupal. So for starters (someone without a website), this is probably the best option. They also have a 30-day money back guarantee.

They use their built-in admin panel (along with cPanel) that makes setting up and managing websites very simple and straightforward.

While their bandwidth is unmetered, the maximum storage varies from 50GB to unlimited – depending on which plan you choose. We recommend getting the prime plan for the most value.

SSL certificate (HTTPS://) is included for free on all plans as well as email accounts. You can let Bluehost transfer your existing website to their hosting environment, but this will cost $149 per website.

Bluehost last 16-month statistics
Bluehost’s test site speed from December 2017 to March 2019 | See stats

Visit Bluehost.com

3. HostGator Cloud – Most Unlimited Hosting ($2.99/mo)

HostGator cloud review
Visit HostGator.com

HostGator Cloud Pros:
+ Good Uptime (99.98%)
+ Fast Load Time (0.43ms)
+ FREE Site Migration (1)
+ No Bandwidth/Storage Limit
Unlimited Email Accounts
+ Free SSL Included

HostGator Cloud Cons:
– Higher Renewal Cost


HostGator cloud hosting offers their users unlimited bandwidth, storage space, and email accounts.

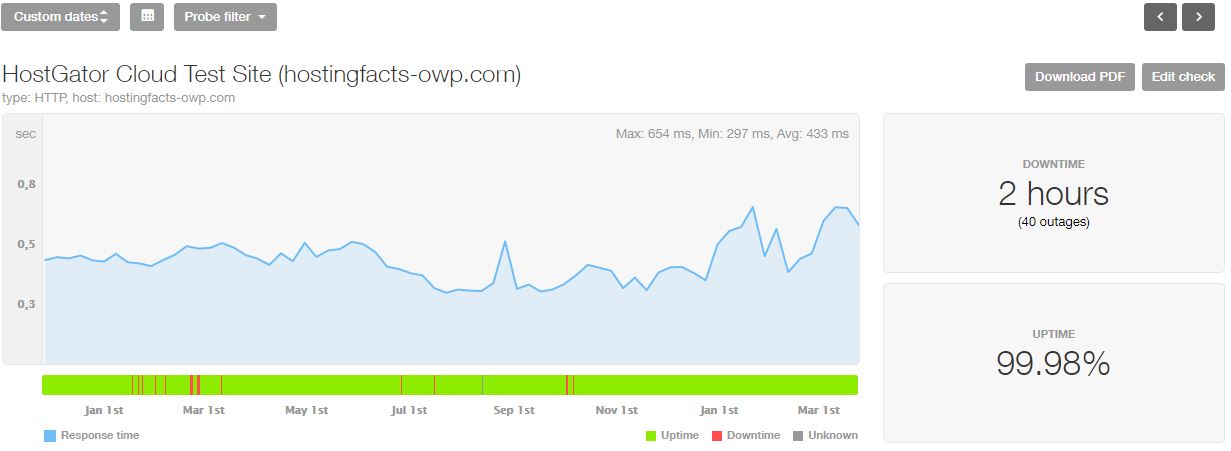
On top of that, they have free site migration if you decide to transfer your website from another host without the hassle. Their last 16-month performance stats aren’t bad either, 432ms load time and 99.98% uptime.

They’re one of the fastest hosts we’ve reviewed, their servers are perfect for WordPress websites. Most of their data centers are based in the US, but the host does well to serve European clients too.

Before you sign up, be sure with the higher renewal prices that start right after your billing period ends. For example, the $2.99 is for the first 1-6 months, then the price jumps to $9.95 – $14.95/mo.

They do have fast and efficient live chat, SSL certificate is included as well as daily backups.

If you need a scalable hosting, HostGator Cloud is probably your best option.

HostGator Cloud last 16-month statistics
HostGator Cloud’s test site speed from December 2017 to March 2019 | See stats

Visit HostGator.com

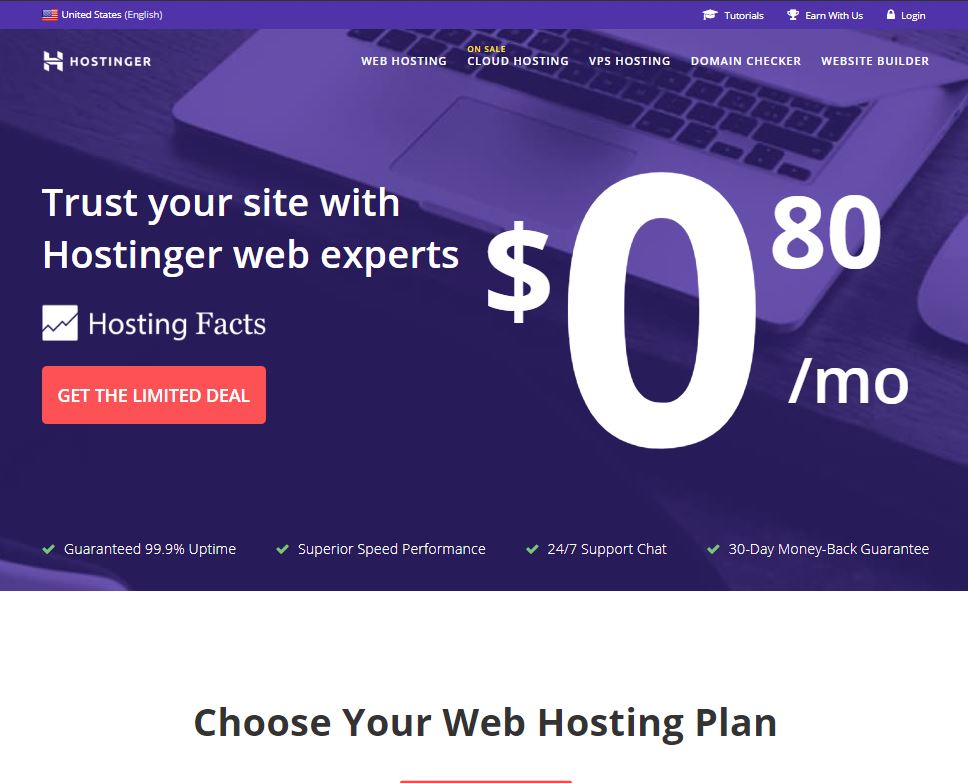
4. Hostinger – Cheapest Web Hosting ($0.80/mo)

Hostinger review

Hostinger Pros:
+ Fast Load Time (0.37ms)
+ Cheapest Plan ($0.80/mo)
+ Datacenters in 7 Regions
+ FREE Domain Name (1 year)
+ Uptime Guarantee
+ 30 Days Money Back

Hostinger Cons:
– SSL Not Included


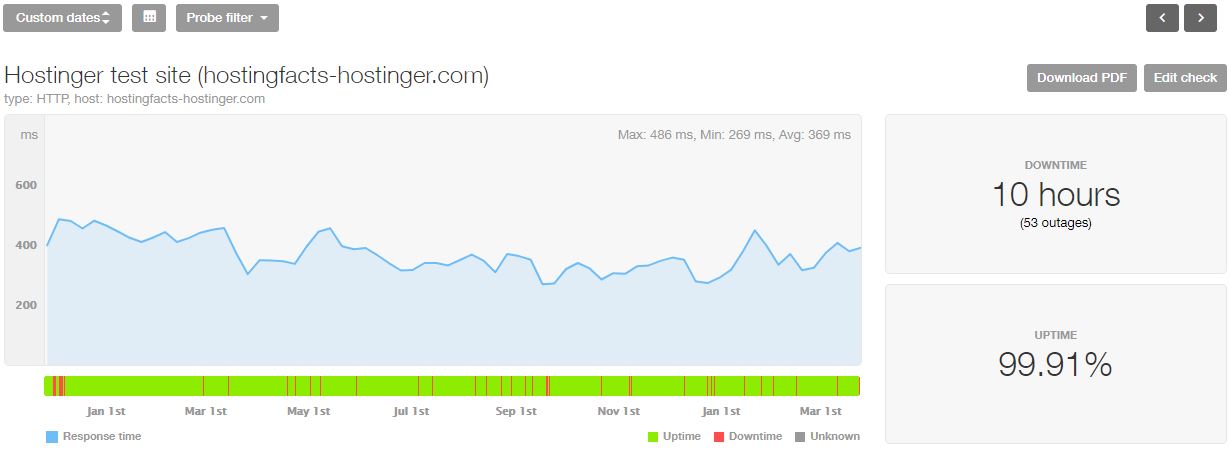
Hostinger is one of the cheapest hosting providers that costs only $0.80/mo when choosing their longest (48 months) subscription.

They have data centers and servers across the world in seven different regions.

While being one of the cheapest, they still manage to achieve a just “okay” uptime of 99.91%. If we were to count only the last 15-months instead of 16-months, then their uptime would be a solid 99.97%. Their average page load time is very fast though, only 0.37ms.

Bandwidth and databases are unlimited unless you choose the “Single Web Hosting” plan. With the latter you’ll be limited to 10GB of disk space, 100GB of bandwidth, one MySQL database, and one email account.

Unfortunately, not everything is cheap. The important add-ons which aren’t included in the basic plans are priority support and SSL certificate which will set you back some more money.

Similarly to Bluehost, they too offer a 30-day money back guarantee on all the hosting plans.

Hostinger last 16-month statistics
Hostinger’s test site speed from December 2017 to March 2019 | See stats

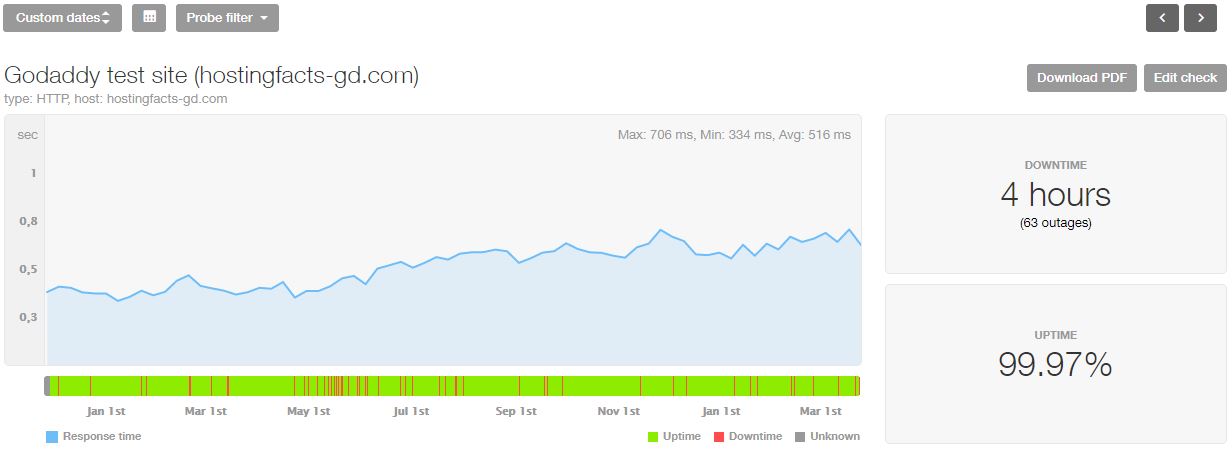
5. GoDaddy – Most Popular Web Host ($3.66/mo)

GoDaddy hosting review
Visit GoDaddy.com

GoDaddy Pros:
+ Good Uptime (99.97%)
Fast Load Time (0.52ms)
+ Many Great Features
+ Well Known Brand

GoDaddy Cons:
– Unreliable Support
– Emails, Backups and SSL Cost Extra


GoDaddy’s brand is easily one of the most well-known domain registrar and hosting provider on the market.

But is their reputation well deserved when it comes to performance and delivering fast page speed?

While their page loading speed is relatively fast, just above 500ms, their uptime isn’t ideal – 99.97%.

A glance at what they offer – a 99.99% uptime guarantee, 100GB of website storage (a lot), unmetered bandwidth and free trial for their website builder, seems like a too good deal.

But when you look at the sheer number of highly pried upsells and sneaky marketing tricks (like charging for site backups, SSL certificates, email accounts, and more), it becomes harder and harder to give credence to the brand’s reputation.

In addition to the many shameless money grabs present inside of GoDaddy’s pricing structure, the inefficacy of their customer support team and lack of compelling freebies (like the industry standard SSL certificate and unlimited email accounts) makes us hard pressed to recommend them above any of the aforementioned hosts.

GoDaddy last 16-month statistics
GoDaddy test site speed from December 2017 to March 2019 | See stats

Visit GoDaddy.com

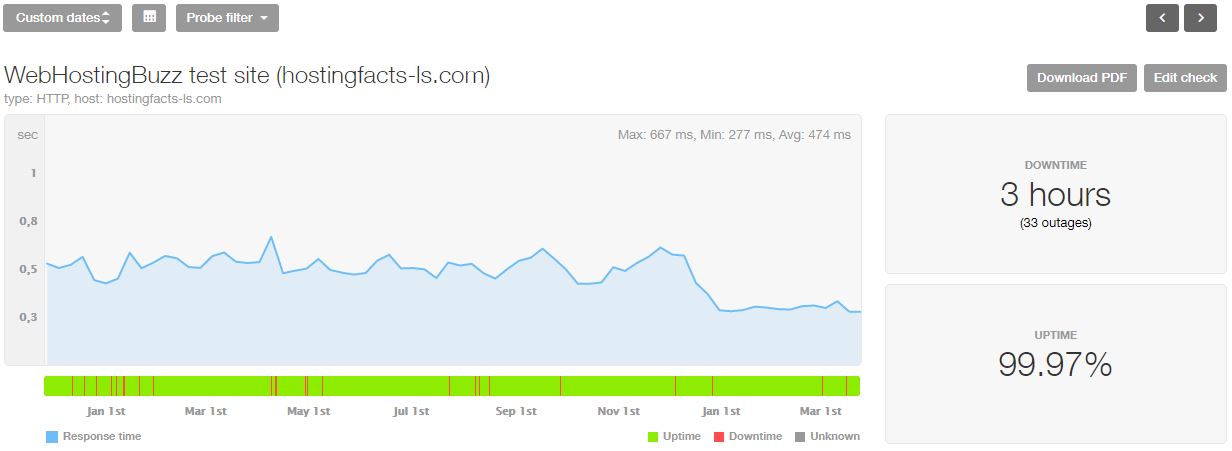
6. WebHostingBuzz – Small, But Reliable Web Host ($4.99/mo)

WebHostingBuzz review
WebHostingBuzz hosting page

WebHostingBuzz Pros:
Good Load Time (0.47ms)
Excellent Support
+ 45-Day Money Back Guarantee
+ Free Migrations & Domain Name
+ Solid Uptime (99.98%)

WebHostingBuzz Cons:
– Payment Terms


Founded in 2002, WebHostingBuzz is specialized in the UK web hosting market.

With more than 250+ server locations worldwide, site load times of only 474ms, and a 99.98% average uptime (which is almost as good as what they advertise) this “under the radar behemoth” brings a lot of value to the table.

Their customer support is some of the best we’ve ever experienced–we had all of our (very technical) questions answered in a matter of minutes–and, when you consider that they offer a 45-day money back guarantee, unlimited bandwidth, 20GB disk space, free site migrations, and a free domain at only $4.99/month… they appear like one of the best hosts on our list.

However, with a 12-month minimum payment term and a 48-month minimum for the advertised price of $4.99, you can get a lot more for your money with another provider.

WebHostingBuzz last 16-month statistics
WebHostingBuzz test site speed from December 2017 to March 2019 | See stats

Visit WebHostingBuzz.com

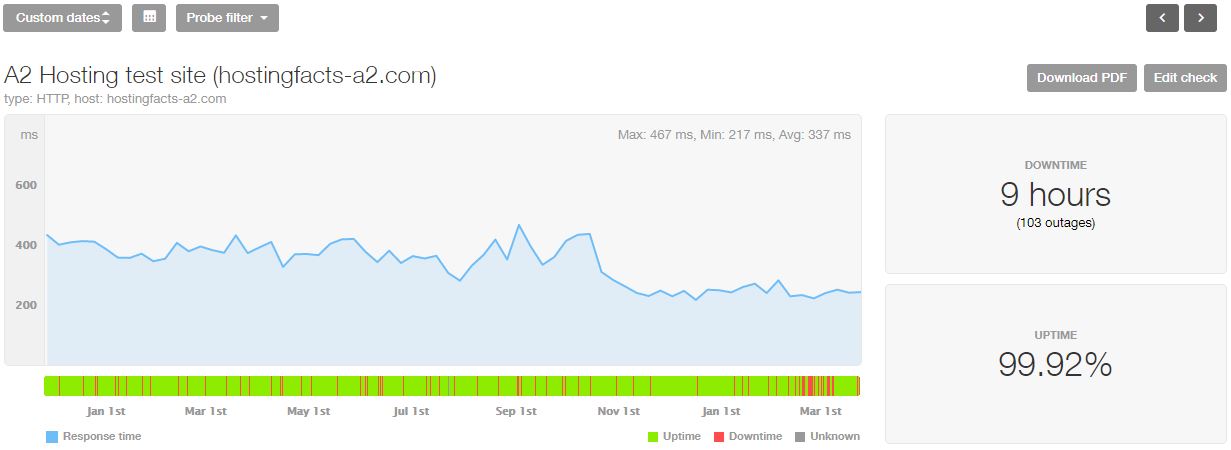
7. A2Hosting – Fastest Shared Web Host ($3.92/mo)

A2 Hosting review
A2 Hosting hosting page

A2 Hosting Pros:
Fastest Load Time (0.34ms)
Quick and Efficient Support
+ Free Site Migration
+ Compatible With Common CMS’s
+ Environment-Friendly

A2 Hosting Cons:
– Uptime could be better (99.92%)
– Restrictions on Cheapest Plan


US-based A2 Hosting is the fastest shared web hosting we’ve tested to date.

Hands down, they’ve managed to achieve 336ms average load time over a period of 16-months. All of their plans offer unlimited bandwidth and storage, responsive customer support (phone and live chat), free SSL certificate, site migration, and domain name…

It’s easy to see why A2 Hosting was almost our favorite host on this list.

However, they were held back from a top-three spot due to two big problems.

First and foremost, their uptimes. With an average uptime of 99.92%, the unreliability of A2’s hosting simply won’t meet the needs of most webmasters.

Furthermore, there are some hefty restrictions placed on their basic web hosting package: like the one-website limit, five database limit, exclusion of addon domains, and WordPress cache limitations. If you want to avoid the limitations, you just need to choose a more flexible hosting plan.

Although they are still one of our favorite hosts, with a $3.92/month price tag renewed at $9.99/month, we can’t recommend them above providers like Hostinger.

A2 Hosting last 16-month statistics
A2 Hosting test site speed from December 2017 to March 2019 | See stats

Visit A2Hosting.com

8. iPage – Best for Small Websites ($1.99/mo)

iPage review
iPage hosting page

iPage Pros:
Strong Uptime (99.97%)
Enhanced Security Options
+ Cheap Inexpensive Hosting ($1.99/mo)
+ Environment-Friendly
+ Upfront Pricing

iPage Cons:
– Expensive Domain Names
– No cPanel


iPage hosting brings a lot to the table.

From 99.97% uptimes, upfront and affordable pricing – $1.99/mo for the first three years then $7.99/mo, free 24/7 live chat and over the phone support, unlimited bandwidth, storage, and domain names and a free SSL certificate and email address… iPage has a lot to offer.

But, as with A2 Hosting, there are a few things that stopped iPage from earning a higher ranking on our list.

Specifically, iPage charges $17/year per domain, $150 for every site transfer, and offers a below-average site speed of only 787ms (the slowest of our top ten hosts).

Furthermore, they don’t offer cPanel access and the purported “unlimited” bandwidth and storage aren’t quite what they appear to be.

If you need a fast, feature rich, and fully equipped website to grow your online business, iPage simply doesn’t cut it. Yet, it might be a solid option for beginners with less money to spend on web hosting.

iPage last 16-month statistics
iPage test site speed from December 2017 to March 2019 | See stats

Visit iPage.com

9. Dreamhost – Best for Web Developers ($2.59/mo)

DreamHost review
DreamHost hosting page

Dreamhost Pros:
Knowledgeable Support
+ 97-Day Money Back Guarantee
+ Unlimited Bandwidth
+ They’re Carbon Neutral

Dreamhost Cons:
– Possible Delayed Setup
– No cPanel


With more than 400,000 active customers and a hosting roster of more than 1.5 million websites, DreamHost is one of the biggest players in the web hosting game.

Founded in 1996 and offering pricing plans that start at only $2.59/mo (for the first 12-months), they’re also one of the oldest and cheapest.

However, there are a few key issues that prevent us from giving them a full endorsement.

Although they offer fast load times of 719ms, a 99.96% average uptimes, a 97-day money back guarantee, and completely unlimited bandwidth, the complete lack of live chat support and a traditional cPanel (in all fairness they do offer their own unique cPanel… but as web professionals, we weren’t fans) makes Dreamhost a hard sell.

With so many amazing hosts out there, DreamHost simply doesn’t offer anything that you can’t get from another host at the same price.

DreamHost last 16-month statistics
DreamHost test site speed from December 2017 to March 2019 | See stats

Visit Dreamhost.com

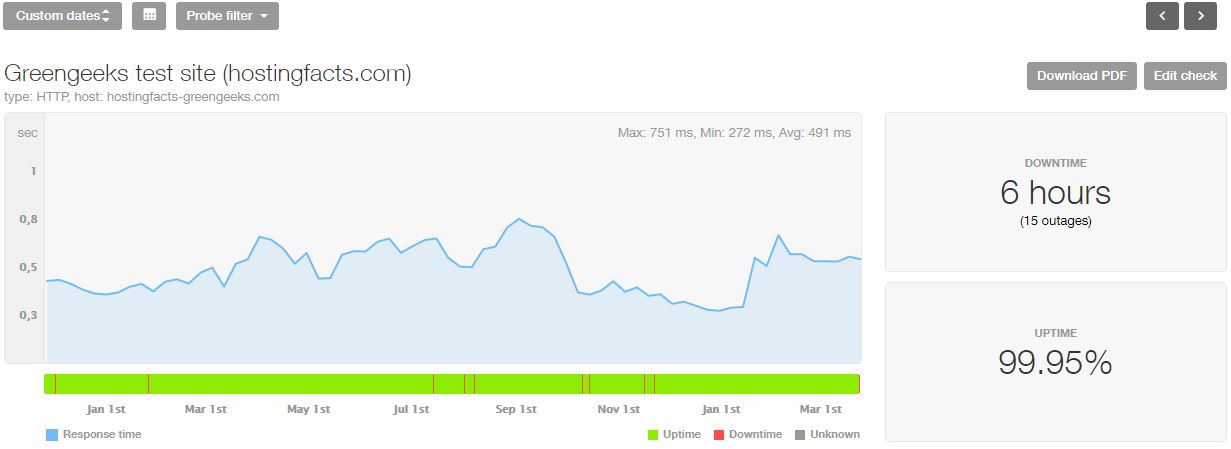
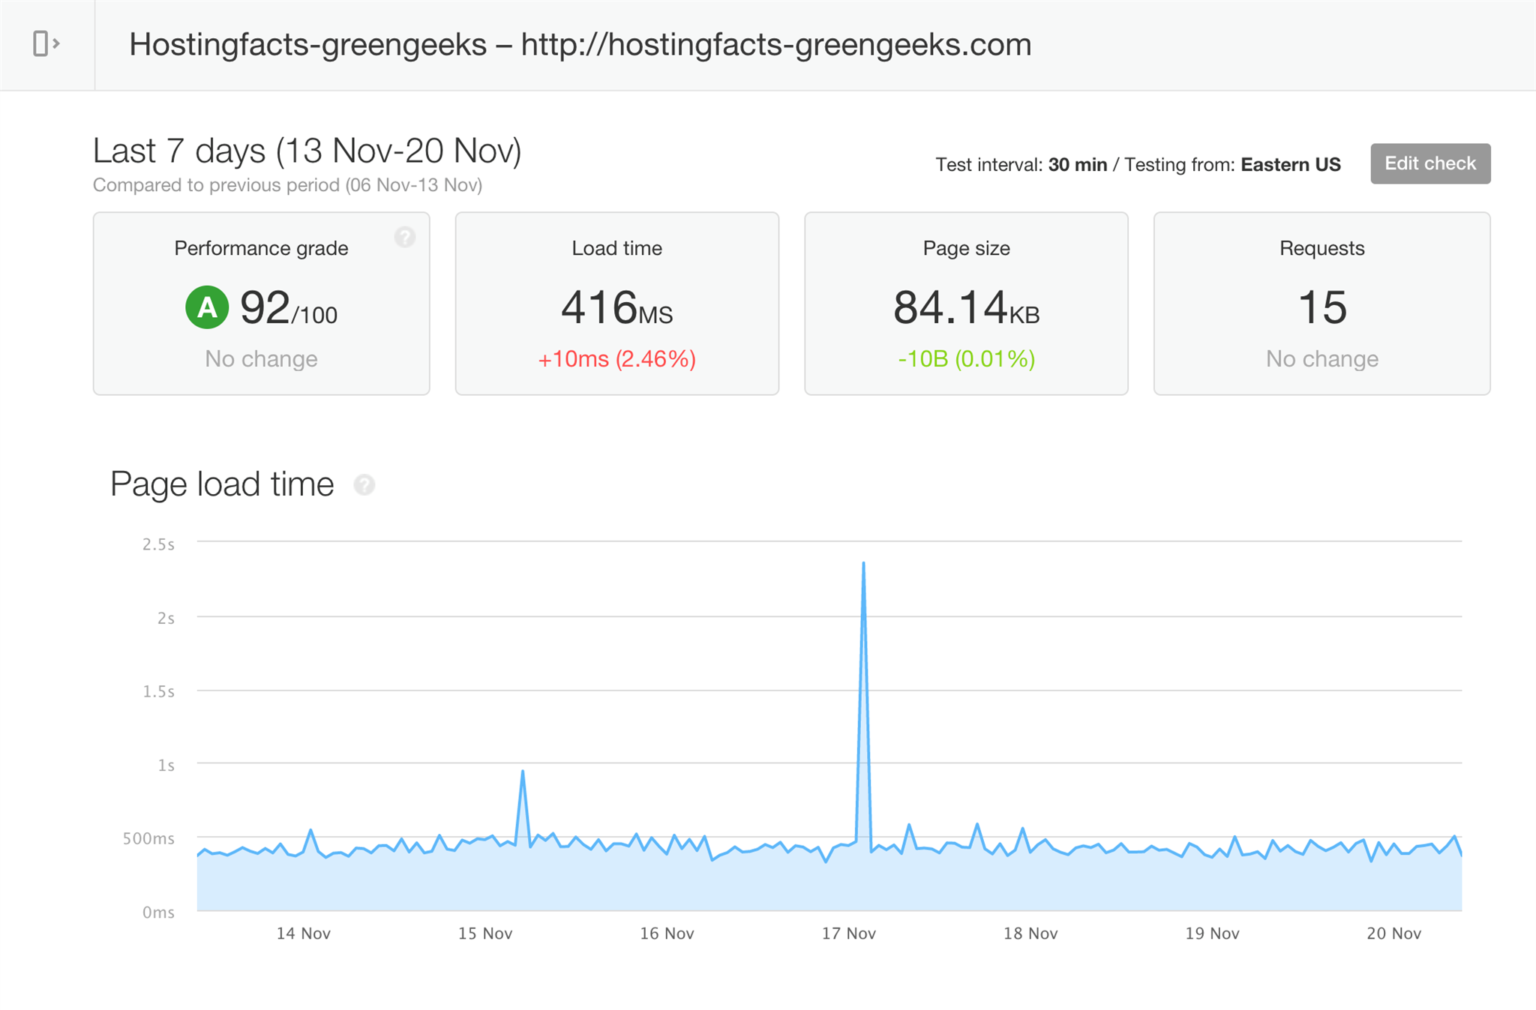
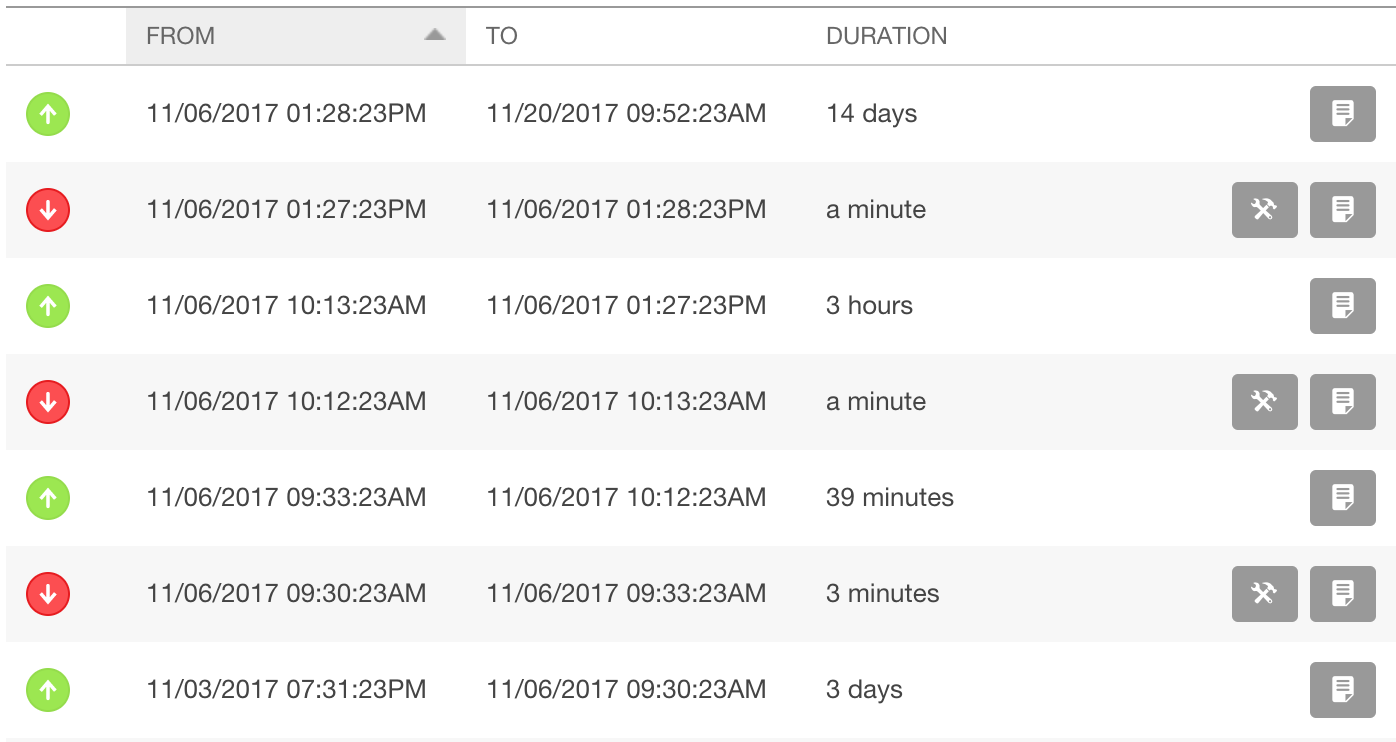
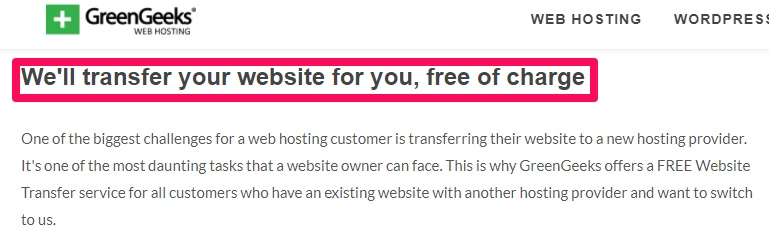
10. GreenGeeks – Best Green Web Host ($2.95/mo)

GreenGeeks review
GreenGeeks hosting page

GreenGeeks Pros:
Good Uptime (99.95%)
Fast Load Time (0.49ms)
+ Environment-Friendly
+ Free Domain Name & Migration

GreenGeeks Cons:
– Higher Renewal Rates
– Questionable Refund Policy


With 99.95% uptimes and load speeds of 493ms, GreenGeeks offers fast and reliable hosting at an affordable rate of $2.95/month.

Add to this their feature-rich bonuses, high-quality customer support, and environmentally friendly practices and it’s easy to see how GreenGeeks are quickly carving out a name for themselves in a wildly oversaturated market.

If you decide to purchase their “Eco-site Starter”, your patronage will be rewarded with unlimited bandwidth, storage, and email accounts, a free SSL certificate, free domain (for the first year–then $13.95/year after), and a free website migration.

Their customer service is responsive, helpful, and available through live chat, email, and over the phone.

Unfortunately, the $9.95/month renewal rate, limited data centers (located in the U.S. and Netherlands only) and questionable refund policy may dissuade some webmasters from choosing GreenGeeks over other hosting providers.

GreenGeeks last 16-month statistics
GreenGeeks test site speed from December 2017 to March 2019 | See stats

Visit GreenGeeks.com

All 12 Web Hosts Reviewed…

RANK WEB HOST COST SUPPORT UPTIME LOAD TIME OUR RATING
1 Bluehost $2.75/mo 10/10 99.99% 406ms ★★★★★
2 HostGator Cloud $2.99/mo 9/10 99.98% 432ms ★★★★★
3 Hostinger $0.80/mo 9/10 99.91% 369ms ★★★★★
4 SiteGround $3.95/mo 10/10 99.99% 713ms ★★★★★
5 GoDaddy $2.99/mo 7/10 99.97% 517ms ★★★★
6 Web Hosting Buzz $4.99/mo 10/10 99.98% 474ms ★★★★
7 A2 Hosting $3.92/mo 10/10 99.92% 336ms ★★★★
8 iPage $1.99/mo 8/10 99.97% 787ms ★★★★
9 DreamHost $2.59/mo 9/10 99.96% 719ms ★★★
10 GreenGeeks $2.95/mo 9/10 99.95% 493ms ★★★
11 A Small Orange $5.92/mo 10/10 99.98% 682ms ★★★
12 Site5 Hosting $6.95/mo 9/10 99.98% 678ms ★★★

About Our Web Hosting Review Process

Unlike other sites, we actually sign up and pay for web hosting.

We break down information about available packages and services, hidden fees, payment methods, and more. When we look at a web host, we start by reading over their terms of agreement to find out if there are any hidden, unfair terms that consumers should know about.

Then, we take a look at what kind of customer support they offer, whether it’s a live chat, phone, ticket, or email. Once we get a test site up and running, we evaluate the user interface of the host’s control panel and the total activation time.

We also monitor our site performance by plugging our domain names into Pingdom to look at speed and uptime.

Pingdom speed and uptime tracking

We look at how fast sites load in certain countries and across certain devices. Our reviews also look at the quality of customer support for each host. We actually contact each host to see how long they take to respond and whether or not they are friendly and helpful.

Based on everything we look over, we assign a total rating for each host that ranges from 0 to 10

Why Uptime and Load Time Matters

Uptime and load time matter because they affect traffic, which in turn, most likely will affect your overall revenue.

You’ve got to keep an eye on both of these metrics because they indicate your site’s quality of performance. Uptime refers to the total time that your website is up and running without problems. Downtime refers to the time when your website is offline and unavailable to visitors and potential customers.

website uptime is important

The time your website isn’t running, you’re losing money.

At the same time, if you have a slow load time, your bounce rate will be off the charts. People don’t want to wait forever for web pages to load. In fact, they won’t wait longer than 3 seconds if they’re using a mobile device to browse. Today, more page views happen on mobile than on desktop.

That’s why you should make sure that your load times are fast and that your uptime is high.

What is Shared Hosting?

how shared hosting works

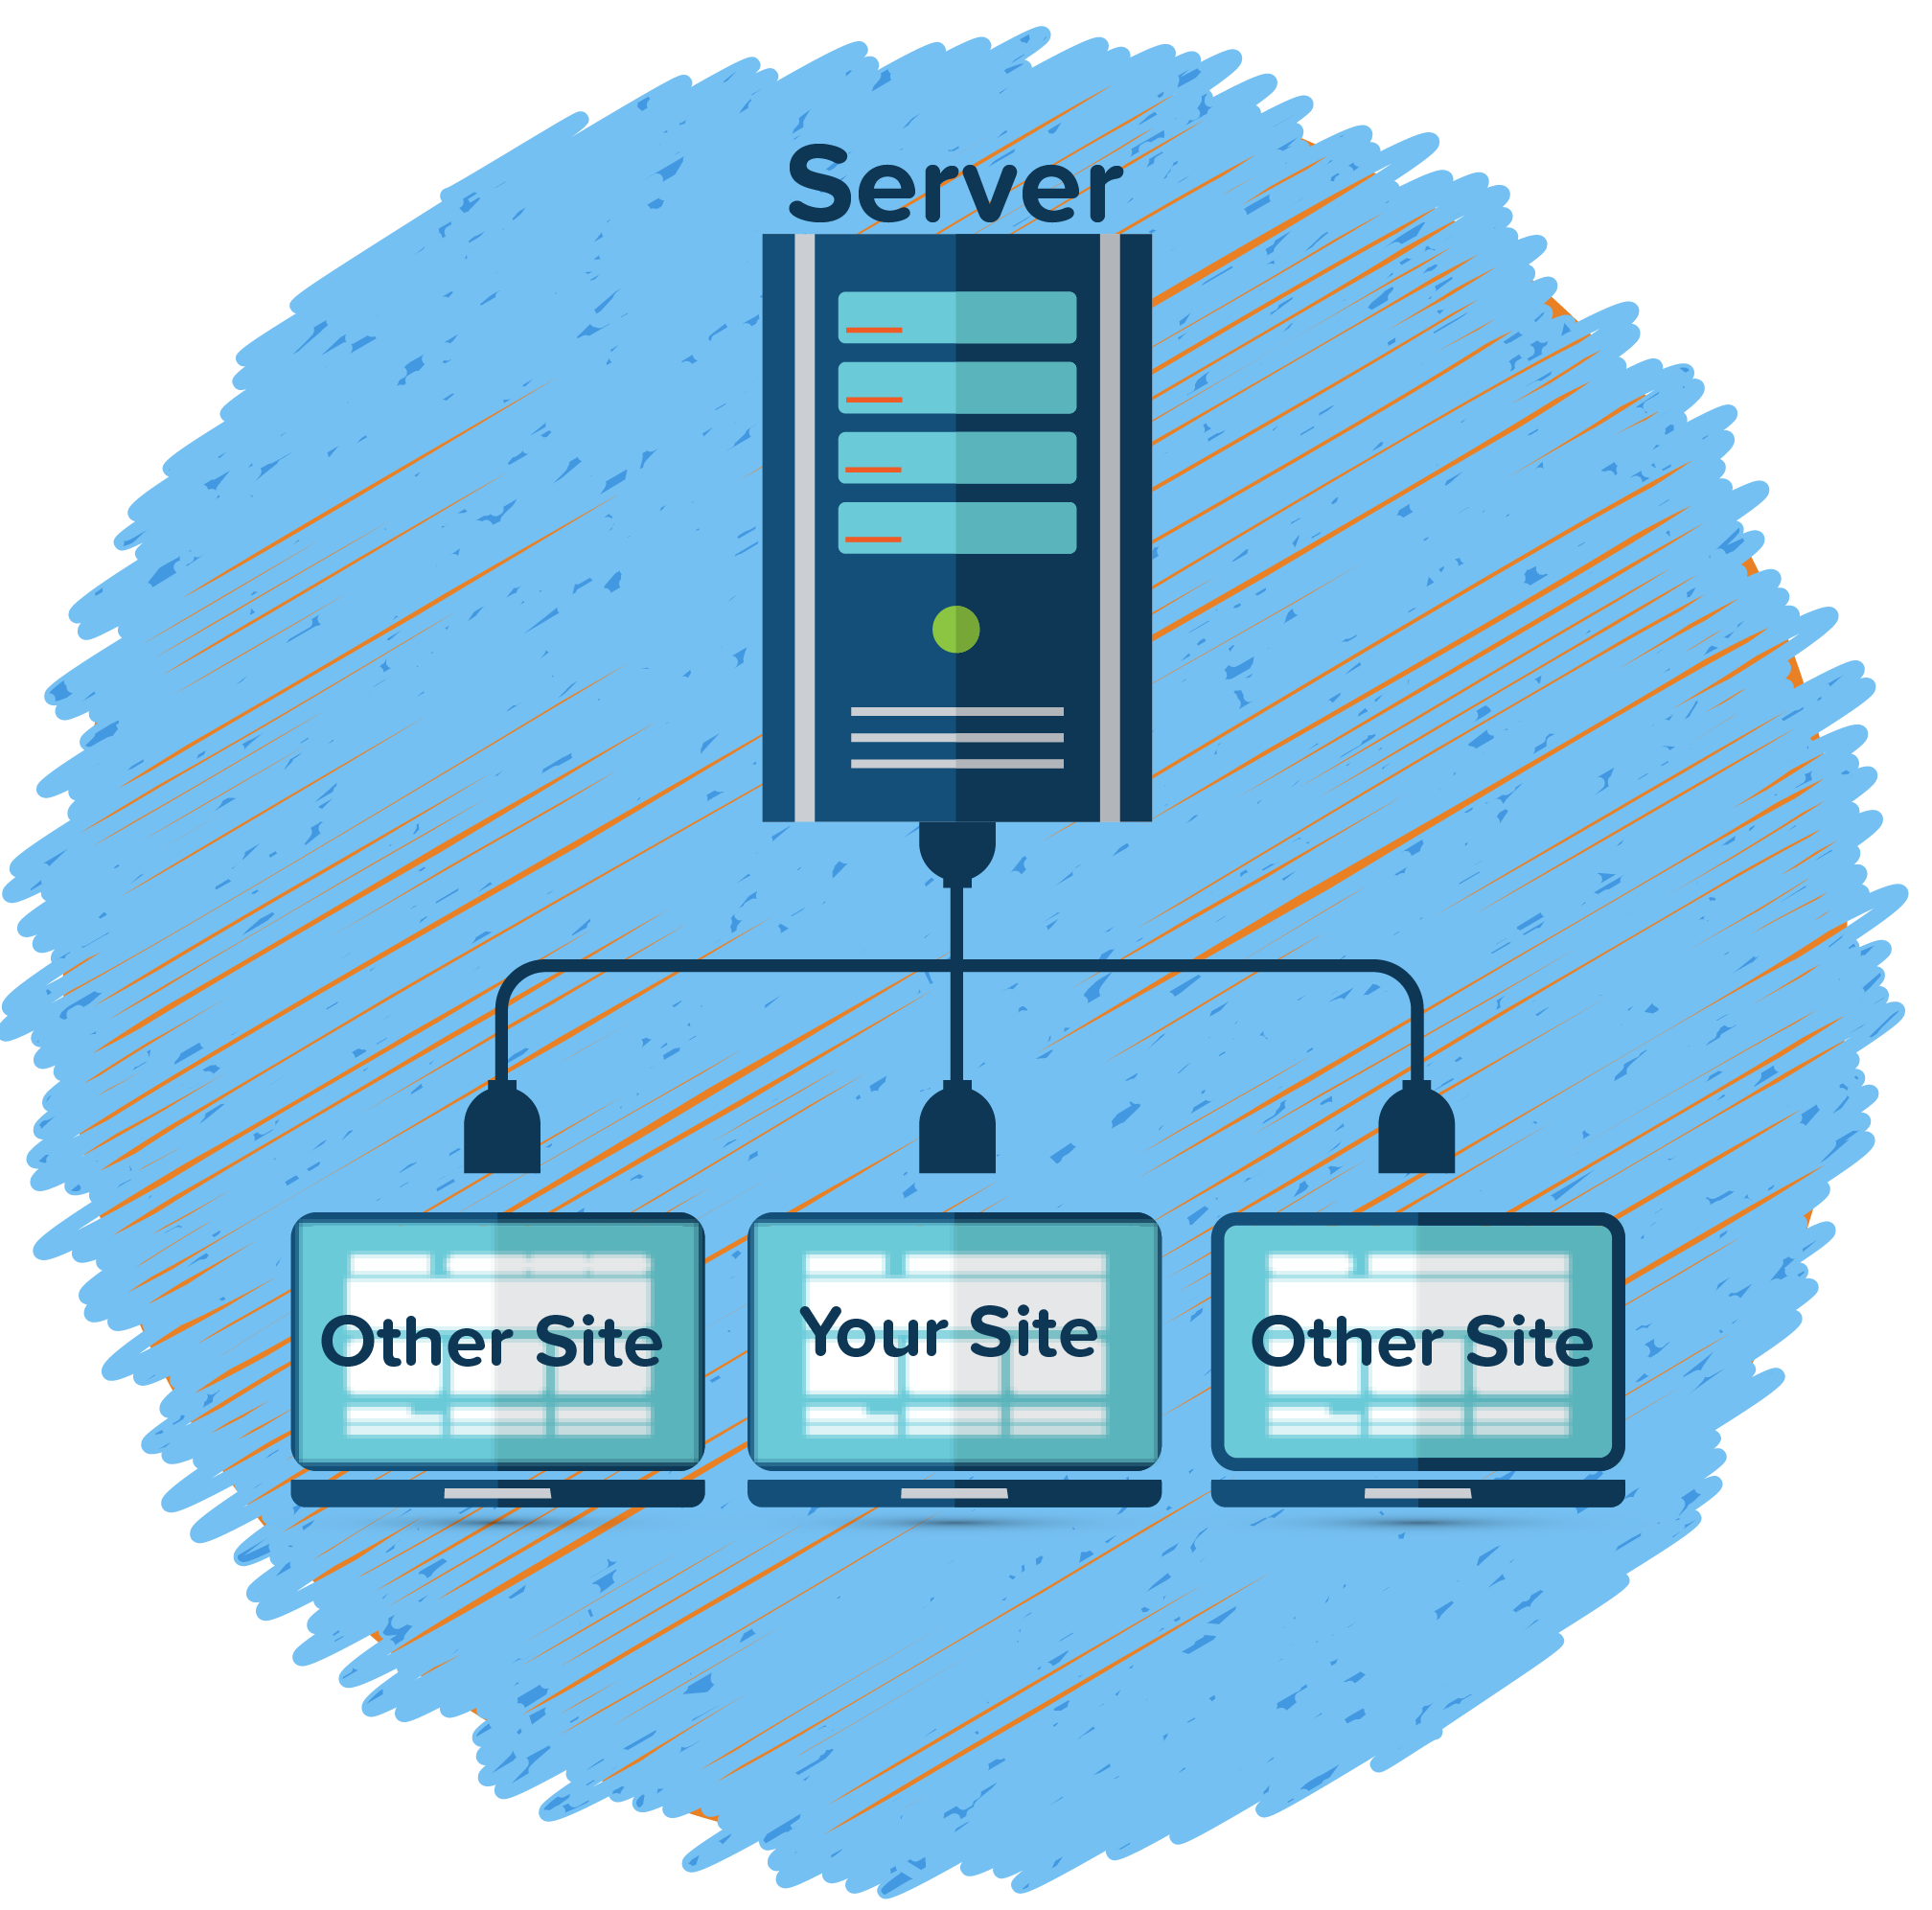
Shared hosting consists of multiple websites on the same web server owned by the web host.

This is easily the most popular (and cheapest) method of web hosting. If your site has high traffic, you might not want to go with shared hosting. Sometimes, resources aren’t shared equally when it comes to this hosting method.

Remember how I told you that a server provides resources for storing files? Well, these resources, like hard drive space and RAM, can slow down if a site you’re sharing the server with is receiving tons of visitors or has incorrect coding.

This can lead to your website going down or experiencing super slow load times, therefore only go with shared hosting if your revenue doesn’t depend on your site’s performance (or if you’re not receiving gobs of traffic).

What is Cloud Hosting?

how cloud hosting worksUnlike shared hosting that relies on one server, cloud hosting uses a cluster of servers that work together to store your website’s files and data.

Cloud-based hosting is great because it’s more efficient and secure than other hosting methods. These cloud systems protect your site against attacks better than traditional hosting systems because all the resources of multiple servers are in one virtual network.

Since the servers are virtual, clients only pay for what they need and use. When a physical server connected to the cloud goes offline or malfunctions, the virtual servers won’t be affected.

Think of it as a pay-as-you-go cell phone plan: You’ll never pay for resources you don’t need. And, if you need more to cover a jump in traffic, all you’ve got to do is pay a bit more money for that period of time.

What is WordPress Hosting?

WordPress hosting is for WordPress websites only. It’s fast because every aspect of WordPress servers has been optimized for setting up WordPress.

Your loading speeds will be much faster on WordPress in comparison to some other shared hosting sites. This is also true for your uptime. It’s also more secure because you’ve got a support team of WordPress experts to back you up if your website is attacked. Plus, your server will always be up to date.

WordPress is a bit less customizable than other hosts, though. For example, certain plugins aren’t permitted, and some plugins can’t be altered. Also, if you choose WordPress as your host, then you will also have to use WordPress as your CMS; it won’t allow you to use other CMS providers.

Site Transfers (FREE or Not?)

What if you pick a web host only to discover that you don’t like it? Site transfers allow you to move your website to another host.

Moving to another website consists of transferring the website’s files and databases, configuring your site with the new host, and directing your domain’s DNS to the new host. Once you pick a new site host, they can usually help you out with this process. The cost will depend on the host you’re switching to, but it will probably be anywhere from $150-$400.

But some web hosts on our list, like HostGator and GreenGeeks, offer free web transfers.

GreenGeeks web transfer

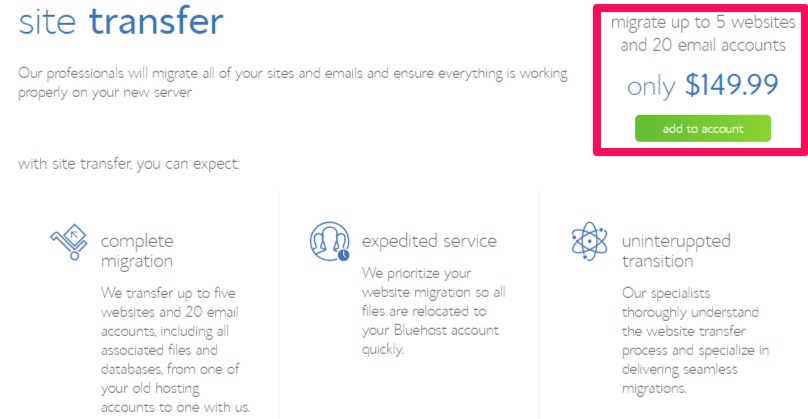
For paid transfers, you can usually transfer more than one site. It’s only $149.99 to migrate as many as five websites and 20 email accounts to Bluehost.

Bluehost site transfer

The site transfer will usually take a few days.

For a host like HostPapa, it will take 5 to 7 days to complete a site transfer. They recommend modifying DNS entries before starting the transfer so that it takes less time.

They can also update your DNS entries, but this service will add 24 to 72 hours before your site becomes live. With A2 Hosting, it’ll take anywhere from 2 to 4 days.

How to Host a Website (Step-by-Step)

How to create a server

To host a website on a server, you’ll need to get your hands dirty and set up the whole environment by yourself. Below, you’ll find a generalized example of how to get things done using a virtual private server running Ubuntu 18.04

In short, you’ll need to:

  • Perform the initial server setup
  • Set up a DNS zone and point your domain
  • Install a software stack
  • Create a virtual host
  • Get your website up and running

P.S. If you don’t want to go through this complicated steps, consider getting a web hosting.

1. The First Server Setup Steps

If you decide to rent a dedicated server or a VPS, you’ll first need to lay a solid foundation. This involves accessing your server through a terminal or an SSH client and making security tweaks and updates.

Connect to Your Server

Start by connecting to your server. The following command will do the trick:

ssh root@your_server_IP -port

When connecting for the first time, you may be prompted to add your server IP to the list of known hosts. Type in yes to proceed and you’ll then be prompted to enter the root password.

adding server IP to known hosts

Here’s an example of what you should see on your screen if everything went right.

initial Ubuntu SSH login screen

Get the Latest Updates

Run the following commands to get the latest updates for your Ubuntu 18.04 server:

sudo apt update
sudo apt upgrade

When running the second command, you’ll see a confirmation screen. Type in Y to proceed.

confirming server updates Ubuntu

Create a New User

Next, you’ll need to add a new user, as using the root one for everyday tasks is not recommended. Let’s call it webmaster. To begin the user creation, execute:

adduser webmaster

creating a new user Ubuntu

Once you create a password, you’ll be prompted to enter the general details (which you can leave blank). Then, type in Y to confirm the new user creation.

By default, the new user won’t have enough privileges to do everything you need, hence you’ll need to add them manually. Here’s how you do it:

usermod -aG sudo webmaster

That’s it! Your new administrative user is ready. To start using it instead of root, execute:

su – webmaster

changing system user

Set Up Public Key Authentication (Optional)

Using a password to authenticate leaves you vulnerable to brute-force attempts and puts your server in a moderate risk (especially if you’re lazy to set up a unique and strong password).

A great way to improve server integrity is to use SSH keys instead of a regular password. The steps should be identical regardless of which Linux distribution you’re running. To begin log out of your server and execute the following command on your local computer to create a new public key:

ssh-keygen

You’ll be asked to enter an additional passphrase and the location of where to save the public key. By default, it saves everything to /Users/Your_User/.ssh directory (which you can keep unless you have other plans in mind).

running SSH keygen

As soon as it’s finished, copy over the SSH key to your server by using:

ssh-copy-id webmaster@your_server_IP

You may also do the same for your root user just in case:

ssh-copy-id root@your_server_IP

moving SSH key to remote server

Finally, you’ll need to login to your server again. Only this time, you’ll be using the SSH key and its passphrase to authenticate. If your password is guessed by someone, they will be unable to log in, as the public key is required to make a successful connection.

logging into server with SSH key

Disable Password Authentication (Optional)

Since you’re now able to access your server with the newly generated SSH key, it’s advisable to disable the regular password authentication. To do so, we can use the nano text editor:

sudo nano /etc/ssh/sshd_config

Look for a line that says #PasswordAuthentication yes, delete the # and change the yes to a no. The final result should look like:

disabling password authentication in sshd config

To save these changes and exit the nano editor, press CTRL+X, type in Y and press Enter. And finally, apply everything by reloading the sshd service:

sudo systemctl reload sshd

And that’s it! You’ll now use a public key to authenticate instead of a password, which is considered a more secure way to access and manage a server.

Set Up a Firewall

Last, but not least, it’s advisable to use a firewall to protect yourself from the dangers lurking on the web. Uncomplicated Firewall is one of the best tools for the job. To set it up, execute:

sudo apt-get install ufw

When installed, the firewall will not work unless turned on manually. You can enable it by using:

sudo ufw enable

enabling ufw Ubuntu

To check if it’s up and running, execute:

sudo ufw status verbose


2. Set Up a DNS Zone

The next challenge will be creating a DNS zone, which acts as the binding material between a domain name and a server. We can break it down into two smaller steps:

  1. Setting up a DNS zone within your server
  2. Creating custom nameservers at your domain registrar

Create a New DNS Zone

To make a new DNS zone, we’ll be using a tool called bind9. In the end, this is the service that allows us to load a website through a domain name instead of an IP address.

To install Bind9 on your Ubuntu 18.04 server, execute:

sudo apt-get install bind9

Once installed, all the files will be available in the /etc/bind directory. Let’s navigate to it first:

cd /etc/bind

To keep everything neat and organized, we’ll create a separate directory for our DNS zones:

sudo mkdir -p zones

Let’s create a new DNS zone file for our domain. We’ll be using domain-example.com for demonstration purposes (you should replace it with your actual domain name).

sudo nano zones/domain-example.com

DNS zone snippet example:

;
; BIND data file for domain-example.com
;
$TTL    3h
@       IN      SOA     ns1.domain-example.com. admin.domain-example.com. (
                          1        ; Serial
                          3h       ; Refresh after 3 hours
                          1h       ; Retry after 1 hour
                          1w       ; Expire after 1 week
                          1h )     ; Negative caching TTL of 1 day
;
@       IN      NS      ns1.domain-example.com.
@       IN      NS      ns2.domain-example.com.


domain-example.com.     IN      A       YOUR_SERVER_IP
ns1                     IN      A       YOUR_SERVER_IP
ns2                     IN      A       YOUR_SERVER_IP
www                     IN      CNAME   domain-example.com.
mail                    IN      A       YOUR_SERVER_IP
ftp                     IN      CNAME   domain-example.com.
domain-example.com.     IN      MX      10      domain-example.com.

Make sure to replace all instances of your Your_Server_IP and domain-example.com with the actual values. Save the zone file by pressing CTRL+X and then typing Y to confirm the changes.

Next up, we’ll need to edit the local configuration and specify the location of our newly created DNS zone. This ensures that the server knows which zone file belongs to which domain name.

sudo nano named.conf.local

Paste down the following lines at the bottom of the file while replacing domain-example.com with your actual website address.

zone "domain-example.com" {
       type master;
       file "/etc/bind/zones/domain-example.com";
};

Press CTRL+X and input Y to save your changes and exit the nano editor.

You can also test out whether everything was added and configured correctly by executing the following command:

sudo named-checkzone domain-example.com /etc/bind/zones/domain-example.com

verifying dns zone

Lastly, run these two commands to restart your server’s DNS service and to make sure it’s running:

sudo /etc/init.d/bind9 restart
sudo /etc/init.d/bind9 start

At this point, the DNS zone is ready from your server side. To finalize it, you’ll need to create custom nameservers entries within your domain registrar.

Create Custom Nameservers For Your Domain

Since we specified two nameservers (ns1.domain-example.com and ns2.domain-example.com) in our DNS zone example, we’ll need to create these entries at the domain registrar and use them.

Here’s how the entries should look like:

Custom Nameserver Points to
ns1.domain-example.com Your_Server_IP
ns2.domain-example.com Your_Server_IP

child nameserver creation

Once created, you’ll need to point your domain to these new nameservers.

3. Install LAMP Stack

LAMP is one of the most used software stacks of the web. It stands short for Linux, Apache HTTP Server, MySQL/MariaDB, and PHP. Before hosting a site, you’ll need to make sure all these ingredients are available at your server. Here’s how the process of setting them up would look using Ubuntu 18.04:

Apache

Apache HTTP Server may already be included in the default packages that come with your server. If not, then execute:

sudo apt-get install apache2

install Apache

Since there’s a firewall, we need to make sure these ports are open as Apache won’t work properly otherwise. Here’s what you should allow through the firewall:

sudo ufw allow 80/tcp
sudo ufw allow 443/tcp

Then, restart it to make sure the changes are applied:

sudo ufw reload

At this point, here’s what you should see by visiting the IP address of your server through a browser:

default Apache2 page

PHP

To get the latest PHP version with a few extra modules that WordPress needs, execute:

sudo apt-get install php php-common php-mysql php-gd php-cli

confirm PHP installation

You can check which PHP version was installed on your server by typing:

php -v

check PHP version

MySQL/MariaDB

MariaDB and MySQL are two of the top choices for your database server in Linux. For this example, we’ll use MariaDB. To install it on your server, execute:

sudo apt-get install mariadb-server mariadb-client

install Mariadb

Once done, you’ll need to use an additional script that comes with the package. It will establish the basic security measures for your database server. Start it by typing:

sudo mysql_secure_installation

At the very first step, you’ll be asked to provide the root MySQL password. Press the Enter button to continue as it’s not created yet. Then follow the rest of the instructions that pop up in the command line interface.

Mariadb secure installation

Finally, you can check if my database server is operational by running:

sudo systemctl status mysql

4 Create a Virtual Host

The next task will be creating a dedicated directory for your website files. Start by changing your working directory:

cd /var/www/html

Use this command to create a folder for your domain and an additional one within in:

sudo mkdir -p domain-example.com/public_html

Then, make the webmaster user we created previously the owner by using:

sudo chown -R webmaster:webmaster domain-example.com/public_html

You’ll also need to make sure that read permissions are applied to the Apache root directory. In this case:

sudo chmod -R 755 /var/www/html/

At this point, Apache gets all the settings from the 000-default.conf file. We’ll need to copy the contents of this file and create a separate one for our domain name. The easiest way to copy a template of the virtual host configuration is by using the following command:

sudo cp /etc/apache2/sites-available/000-default.conf /etc/apache2/sites-available/domain-example.com.conf

Essentially, this makes a copy of the file under a different name in the same directory. This is the file that tells your Apache web server the location of a domain’s root directory, error log, and other important paths. To change its content, we’ll use nano:

sudo nano /etc/apache2/sites-available/domain-example.com.conf


Apache config example:

<VirtualHost *:80>
        # The ServerName directive sets the request scheme, hostname and port that
        # the server uses to identify itself. This is used when creating
        # redirection URLs. In the context of virtual hosts, the ServerName
        # specifies what hostname must appear in the request's Host: header to
        # match this virtual host. For the default virtual host (this file) this
        # value is not decisive as it is used as a last resort host regardless.
        # However, you must set it for any further virtual host explicitly.

        ServerAdmin admin@domain-example.com
        DocumentRoot /var/www/html/domain-example.com/public_html
        ServerName domain-example.com
        ServerAlias www.domain-example.com
        
        # Available loglevels: trace8, ..., trace1, debug, info, notice, warn,
        # error, crit, alert, emerg.
        # It is also possible to configure the loglevel for particular
        # modules, e.g.
        #LogLevel info ssl:warn

        ErrorLog ${APACHE_LOG_DIR}/error.log
        CustomLog ${APACHE_LOG_DIR}/access.log combined
        
        # For most configuration files from conf-available/, which are
        # enabled or disabled at a global level, it is possible to
        # include a line for only one particular virtual host. For example the
        # following line enables the CGI configuration for this host only
        # after it has been globally disabled with "a2disconf".
        #Include conf-available/serve-cgi-bin.conf
</VirtualHost>

Make sure to replace all instances of domain-example.com with your actual domain name. To save the file, press CTRL+X and confirm by typing Y. The final result should look like:

adding domain config to Apache

At this point, you’ll need to turn off the default virtual host configuration file and use the newly created one. This command will disable it:

sudo a2dissite 000-default.conf

Then, add the recently created configuration file as shown below:

sudo a2ensite domain-example.com.conf

Lastly, you’ll need to restart Apache for the changes to apply. You can do that by running:

sudo systemctl reload apache2

You successfully installed LAMP on your server. Since your domain is already pointed to the server, you may need to wait a few hours for the DNS to fully propagate. Then you should see a similar screen when visiting your domain through the browser.

domain root directory content

5. Set Up WordPress (or Upload a Website)

Since the initial server setup is finally complete, it’s time to host a website on it. In this section, we’ll show you a generalized example of how to get a WordPress site up and running.

Create a New MySQL Database and User

Start by accessing the MySQL interface through the terminal:

sudo mysql

>Use the following syntax to make a new database:

CREATE DATABASE wpdatabase;

Then, create a new user and specify the password:

CREATE USER 'wpuser'@'localhost' IDENTIFIED BY 'SuperSecurePassword123';

Next, assign administrative privileges to your newly created user with:

GRANT ALL PRIVILEGES ON wpdatabase.* TO 'wpuser'@'localhost';

That’s it! Your MySQL user and database are ready for action. To turn off the interface, type in:

exit

Move WordPress Files to Your Server

Last, but not least, we have to get the actual website files uploaded to the root directory of your domain. There are two approaches that we’ll describe step-by-step:

  • Using the wget command to get the latest WordPress version
  • Configuring an FTP client (such as FileZilla)

Method 1: Using the Command Line Tools

The first way is to use a command called wget. To use it on your server, you’ll have to install it:

sudo apt-get install wget

Then, change your working directory to the root folder of your domain name:

cd /var/www/html/domain-example.com/public_html

Use the wget command to download the latest version of WordPress from the web:

wget https://www.wordpress.org/latest.zip

Then, extract all the contents of the archive by using:

unzip latest.zip

By default, all the files will appear in a new directory called wordpress (which may result in your website working via domain-example.com/wordpress). For everything to work correctly, we’ll need to move all the files out of that directory to the one above. Here’s how to do it:

cd wordpress

The following command will move all files from the current directory to your specified location:

sudo mv * /var/www/html/domain-example.com/public_html/

Before starting the installation, you’ll need to prepare your wp-config.php file. Since only a sample one is provided. Start by renaming it:

sudo mv wp-config-sample.php wp-config.php

Then, edit the file using nano and add the MySQL database configuration details.

sudo nano wp-config.php

Make sure to update the MySQL User, Database, and Host sections with the values that you created previously.

editing WP config

Lastly, visit your domain name in the browser and you’ll see the initial WordPress setup screen.

initial WordPress setup

Once you finish it, you can install a migration plugin such as All-in-One WP Migration to import an existing WordPress website.

Method 2: Using an FTP Client

Alternatively, you can use an FTP client such as FileZilla. In case you configured an SSH key and disabled password authentication, you’ll need to use it to log in instead of the regular username and password combination. To configure the SFTP connection:

  1. Go to FileZilla Site Manager and add a New Site.
  2. Set the protocol to SFTP – SSH File Transfer Protocol.
  3. Enter your server IP in the Host field and set the port to 22.
  4. Set the login type to Key file.
  5. Specify the path to your SSH key (e.g. /Users/Name/.ssh/id_rsa).
  6. FileZilla will convert it into a .ppk file, which you can then use to make a connection.

converting SSH key

The final configuration should look something like this:

FileZilla sftp configuration

Now, you’ll be able to access your server via FTP and upload any files directly from your computer.

FileZilla sftp connection

Congratulations! You’ve learned how to host a website on a virtual private server running Ubuntu 18.04. Everything from the initial server setup to preparing the software stack has been covered. All that’s left is to grab a server and get your hands dirty!

This article was published with the help of Hostinger.com.

The post How to Host a Website (Step-by-Step) appeared first on HostingFacts.com.

-